6.2 AEMO Gateway GUI Installer
This release provides a staged introduction of the AEMO Australian Energy Market Operator Gateway Software, focused on supporting IDX Industry Data Exchange use cases, including BPQD Basic Power Quality Data. A subset of power quality data consisting of voltage, current, and phase angle.
The AEMO Gateway GUI installer included in this release supports IDX configurations only.
Installation and configurations for pdrMonitor within this GUI installer, is planned for future releases.
6.2.1 Downloading the application
The latest version is the AEMO Gateway Installer 8.0. For download locations, see Data Interchange resources.
Decompress the .ZIP file to a work folder to create a .JAR file. The .JAR file is the installation file referenced elsewhere in this document.
6.2.2 Environment prerequisites
The Gateway Software needs:
-
A Java Runtime Environment (JRE) compatible with the certified version for this application.
-
OAuth 2.0 credentials, including a Client ID and Client Secret, for authentication with IDX APIs.
-
Valid TLS certificates to establish secure connections with IDX endpoints.
-
A public signing certificate to support message signing and verification when interacting with the IDX Hub.
6.2.3 Overview
The base install of AEMO gateway is intended to provide a simplified filesystem-based integration as a starting point which can be adjusted by configuration to any of the supported channels as required.
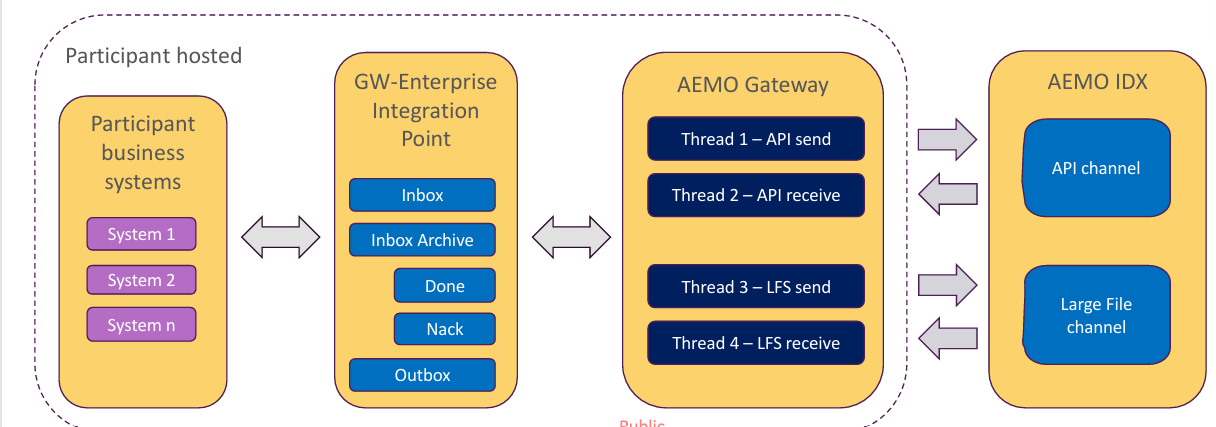
Configuration Model for AEMO Gateway base install – data sources

6.2.4 Installation
To install and configure the AEMO Gateway Software application:
-
Validate the JRE installation is Open JDK 21 by running the following in a command prompt:
java -version
The response should be similar to:
openjdk version "21" 2023-09-19
OpenJDK Runtime Environment (build 21+35-2513)
OpenJDK 64-Bit Server VM (build 21+35-2513, mixed mode, sharing)
-
If a different java version is detected, refer to the documentation to install the certified JRE version.
-
Validate the jar file signature. From the command line prompt, run the following command:
jarsigner -verify "Participant Data Replication Batcher IDX GUI Installer v8.0.jar"
For more information, see https://docs.oracle.com/en/java/javase/21/docs/specs/man/jarsigner.html.
-
Start the installer using one of the following methods:
-
Double-click the JAR file in a Windows environment, if *.jar files are associated with a Java Runtime Environment (JRE).
-
Run the installer from the command line:
- Open a command prompt.
- Navigate to the folder where the installer is stored.
- Run:
java -jar <insert installer name here>.jar
-
-
For headless environments, such as Linux, run the installer in a terminal session using the -console flag:
java -jar <insert installer name here>.jar -console

Provides the same capabilities as the GUI installer but runs entirely in text mode.
-
Accept the terms of the licence agreement and click Next.

-
Select the installation detail by clicking the required checkboxes and click Next.

- pdrBatcher Core: Mandatory, being the standard software installation.
- WebSocket: Select this option to enable WebSocket notifications for outbound messages. This reduces the latency of outbound data. WebSockets functionality is not yet available from the core platform. AEMO will provide details on when the WebSocket service becomes available.
- Windows Service: Select this option if the AEMO Gateway Software is to run as a Windows service. This option is unavailable for installations on unix-type operating systems.
- Secured API services: The secured API services option allows the installation to be configured with a self-signed certificate to encrypt API communications from PDR monitor to the Gateway Software. AEMO recommends you select this option for cyber security purposes. De-selecting this option results in plain text HTTP communications between PDR Monitor and the Gateway Software.
The self-signed certificate has a 365-day expiry period. Participants need to re-generate a new certificate before the expiry date to allow monitor communications to continue.
Participants may also choose to use a certificate issued by an external Certificate Authority, however AEMO does not support this as a part of the AEMO GUI installer.
In this case, participants must register their certificate manually using command line tools.
Please refer to the certificate management section of the user guide for further information on certificate management. - Advanced: Select this option to override advanced configuration properties such as the Windows Server name or the location of the Java Runtime Environment used to run the application. You can also select this option if your organisation uses a proxy for http traffic.
-
Select the location to install the application and click Next.

If you want to use an existing directory, click Browse and select the installation location. -
Enter the required configuration details and click Next.

The required fields are:- Participant ID: Your participant identifier.
- Password Encryption Key: A 16-digit hexadecimal code (A-F,0-9) to secure your password.
- Instance ID: Instance identifier that uniquely identifies this Gateway Software installation.
- API Client Id: The OAuth ClientId that is used for connection to the AEMO IDX Hub. This is created and managed by the participant's Administrator in URM.
- API Secret: The OAuth secret that is associated with the ClientId used for connection to the AEMO IDX Hub. This is created and managed by your Org Admin in the IDAM solution.
- TLS Keystore file: A keystore file that contains the required certificates for connectivity and validation of payload signatures. The Certificate Helper will assist in creating the required keystore file. The required certificates are:
- A private key that has been signed by AEMO (refer TLS management in Markets Portal).
- Intermediate and root certificates that were used for the certificate signing response.
- Public key that is used by the AEMO IDX Hub for signing outbound payloads.
- Keystore Password: The password that protects the TLS keystore file and allows the AEMO Gateway to access the private key and certificate stored in the keystore.
- Source Environment: Select either AEMO production, AEMO pre-production, or Other environment. Selecting Other environment allows you to enter a customised IP address.
- Data Staging Directory: The data staging directory is a folder on the local filesystem that is used as an integration point between a participant’s systems and the AEMO Gateway. A series of folders will be created under this directory (Inbox/Outbox) by the installer that can be used for sending and receiving data to the IDX hub.
- Web Server Port: Choose a port number for the web services interface. This must be unique across all installations of Gateway Software and pdrLoader on this server.
- Windows Service Name: Required if the Advanced installation option is selected. The default Windows service name is pdrBatcherIDX.
- JRE install directory: required if the Advanced installation option is selected. The home directory of the Java Runtime environment used to run the Gateway Software application.
- Web Browser proxy hostname: If your organisation uses a proxy to access AEMO services, enter the proxy host here otherwise leave blank. Refer to your organisation’s platform support team to see if this is relevant.
- Web Browser proxy port: If your organisation uses a proxy to access AEMO services, enter the proxy port here otherwise leave blank. Refer to your organisation’s platform support team to see if this is relevant.
-
Select your relevant business function and click Next.

-
The required folders for the application are then installed, reflected in the installation progress display. Upon completion of this process, click Next.

-
The processing form displays, configuring your software installation according to the selected option and settings. If an error occurs, click Previous and correct the required settings.

-
Once the installation is complete, the finish form displays. Click Done to close the installer.

The Generate an automatic installation script button is an advanced option used to generate a configuration file used for silent installs. It is recommended for advanced users running multiple installations.
6.2.5 Testing your installation
Once your installation is complete, you can test it is working correctly using the following steps:
-
Run the pdrConnectionTest script in the Lib folder and confirm connectivity to all defined data sources.
-
Start the application using the method most suitable for your installation and environment:
- For a Windows service installation, start the service from the windows service panel.
- For a Windows console installation, start the application by double-clicking the pdrBatcher.bat in the Lib subdirectory.
- For a Linux installation, start the application by running the pdrBatcher.sh shell script in the Lib directory.
-
Check the contents of the pdrBatcher log file located in the Log folder and ensure that there are no messages with an ERROR status. In the event of ERROR messages, check all parameters, your environment, and repeat the installation if necessary.